Home Blog Page 45

Trailer Hitches Explained: What Drivers Should Know About Towing Capacity, Fitment, and Safety

Photo by depositphotos at https://depositphotos.com/

In the automotive world, performance is about more than horsepower, acceleration, and handling. The ability to transport a race car, haul motorsports equipment, or tow a recreational trailer also depends on having the right vehicle setup. For truck owners and motorsports enthusiasts, a trailer hitch is one component that deserves just as much attention as other essential equipment.

Choosing the right hitch involves more than finding a model that fits the vehicle. Towing capacity, hitch height, trailer weight, and compatibility all affect how safely and effectively a vehicle can pull a load. Options such as adjustable trailer hitches can be particularly useful for drivers who tow different trailers and need greater flexibility when matching hitch height to trailer coupler height.

Whether you’re hauling a track car to race weekend or transporting equipment for your next automotive project, understanding the basics of trailer hitches can help you make a smarter decision.

Understanding the Different Types of Trailer Hitches

Not all trailer hitches are designed for the same purpose. The right choice depends on the vehicle, the trailer, and the weight involved.

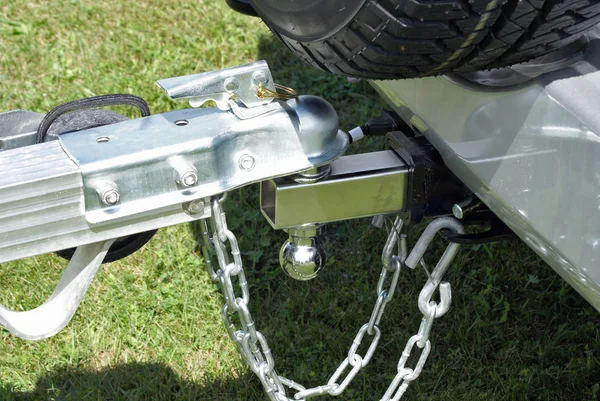
Receiver hitches are among the most common options for pickup trucks and SUVs. They feature a receiver tube that accepts compatible ball mounts and other accessories. Depending on their design and rating, they can support everything from lighter utility trailers to substantial towing applications.

Fifth-wheel hitches are typically installed in the beds of pickup trucks. They connect to a trailer through a specialized coupling mechanism and are commonly used for larger recreational and commercial trailers.

Gooseneck hitches also mount in the truck bed but use a ball-style connection. They are frequently used for heavy-duty hauling, including certain livestock and equipment trailers.

Each hitch type has specific installation requirements and weight ratings. Choosing one based solely on its appearance or advertised capacity can lead to compatibility problems. Always check the vehicle manufacturer’s towing specifications and the hitch manufacturer’s requirements before purchasing equipment.

Why Hitch Height Matters When Towing

A properly matched towing setup helps keep the trailer at its recommended level while traveling. If the hitch sits too high or too low, the trailer may ride at an undesirable angle, potentially affecting handling and weight distribution.

This becomes especially relevant for drivers who tow multiple trailers. A utility trailer, enclosed car hauler, and recreational trailer may have different coupler heights, even when connected to the same truck.

An adjustable hitch provides a practical way to accommodate these differences. By changing the mounting height, drivers can match the hitch to different trailer configurations without necessarily purchasing a separate fixed-height mount for each application.

However, adjustability does not increase the vehicle’s towing capacity. The hitch, ball mount, hitch ball, receiver, and other connected components must all be compatible and properly rated for the intended load.

Before heading out, measure the receiver and coupler heights, account for the vehicle’s loaded ride height, and follow the trailer manufacturer’s recommendations for a level towing position.

Towing Capacity Is More Than a Hitch Rating

One of the most common towing mistakes is assuming that a high-rated hitch automatically makes a vehicle capable of pulling a heavy trailer.

In reality, several specifications determine what a vehicle can safely tow. These include its maximum towing capacity, gross vehicle weight rating (GVWR), gross combined weight rating (GCWR), payload limit, and applicable axle ratings.

Tongue weight is another important consideration. This is the downward force that the trailer applies to the towing vehicle through the hitch. Too much tongue weight can overload the rear axle or reduce available payload, while too little can contribute to trailer sway.

For motorsports enthusiasts transporting a race car, the total load can add up quickly. The trailer itself, the vehicle being transported, spare tires, tools, fuel containers, and other equipment all contribute to the overall weight.

Check the loaded trailer weight rather than relying on its empty weight. Staying within every applicable rating is essential, even when the hitch itself has a higher advertised capacity.

Essential Checks Before Every Tow

A trailer hitch is only one part of the towing system. The condition of the surrounding components matters just as much, particularly when traveling long distances or carrying valuable equipment.

Before leaving, inspect the hitch for cracks, corrosion, loose fasteners, or visible damage. Confirm that the hitch pin or locking mechanism is secured, the coupler is properly latched, and safety chains are attached according to the manufacturer’s instructions and local requirements.

Check the trailer’s lighting and electrical connections, too. If the trailer requires brakes, make sure the braking system and any required breakaway equipment are functioning correctly.

Tire pressure deserves attention on both the towing vehicle and trailer. Underinflated tires, overloaded axles, and poorly secured cargo can create problems that become more serious at highway speeds.

Drivers should also allow additional stopping distance, make wider turns when necessary, and avoid sudden steering inputs. If trailer sway develops, follow the vehicle and trailer manufacturers’ guidance for safely reducing speed and regaining control.

Choosing a Hitch for Your Automotive Needs

The best trailer hitch is not necessarily the biggest or most expensive option. It is the one that fits the vehicle, matches the trailer, and supports the intended workload within all applicable weight limits.

Start by identifying what you plan to tow and how frequently you’ll use the setup. Someone hauling a lightweight utility trailer occasionally may have different requirements from a motorsports team transporting a race car and spare equipment every weekend.

Consider receiver size, hitch height, corrosion resistance, installation requirements, and compatibility with your existing towing accessories. If you regularly switch between trailers, an adjustable design may offer added convenience.

Professional installation can also be worthwhile, especially when a setup involves heavy loads, specialized mounting requirements, or integrated electrical and braking systems.

Final Thoughts

Trailer hitches may not attract the same attention as engines, suspension upgrades, or performance tires, but they play an important role in getting vehicles and equipment where they need to go.

For everyday drivers and motorsports enthusiasts alike, the right setup starts with understanding towing capacity, choosing compatible components, and paying attention to hitch height and maintenance. A few checks before each trip can help prevent avoidable problems on the road.

Whether you’re heading to the track, hauling equipment, or preparing for a long-distance towing trip, treating your hitch as an essential part of your vehicle setup is a smart move. Good preparation makes towing more predictable and helps keep both your vehicle and your cargo protected.

Dash Cam Parking Mode in Winter: How to Protect Your Car Without Draining Your Battery

Quick Answer

Winter makes parked cars more vulnerable: icy lots mean more bumps and slides, and hit-and-runs are hard to prove without dash cam footage. A dash cam with motion sensor and impact detection can record what happens while you are away, but it also draws power from a battery that is already weaker in the cold. The safest setup is a hardwire kit with adjustable low-voltage protection, a conservative cutoff setting, and a battery that has been tested before the first freeze.

Your car spends far more time parked than driven, and in winter that parked time carries two risks at once. One is damage you may never see happen. The other is a battery that has less power to spare. Here is how to handle both.

1. Why Winter Makes Parking Mode More Valuable

Icy parking lots and slippery streets lead to more low-speed collisions and slides. A car left at the curb overnight, or in a lot all day, is easy to hit and drive away from. Without evidence, a damage claim becomes your word against nobody’s.

Parking mode keeps the dash cam watching after the engine is off. A G sensor dash cam detects the impact itself, while a dash cam with motion sensor can start recording when someone walks up to the car. A front and rear dash cam covers both directions, which matters when the car that hits you is behind. And because winter days are short, a night vision dash cam helps keep that footage usable after dark.

2. Why Cold Weather Puts Your Battery Under Pressure

Low temperatures reduce a battery’s available starting power, and a cold engine needs more power to start. According to NHTSA, vehicles need more power to start in winter, which is why it recommends having a mechanic check the battery and charging system. For more, see the NHTSA winter driving tips.

Parking mode adds a steady draw on top of that. A healthy battery can usually handle it. An older or weak battery may not, and the first sign is often a car that won’t start on a frozen morning.

3. Why a Hardwire Kit Is the Right Power Source

A USB powered dash cam plugged into the cigarette lighter usually loses power when the ignition goes off, so it can’t support parking mode. The right solution is a hardwire kit for dashcam use, which connects the camera directly to the car’s fuse box and does three things:

Constant power. The camera keeps recording after the engine is off.

Voltage step-down. It converts your car’s 12V or 24V supply to the 5V the camera needs.

Low-voltage protection. When the car battery falls to a set level, the kit cuts power to the camera, so enough charge remains to start the engine.

That last feature is the most important in winter. It is what keeps parking mode from becoming a battery drain.

4. Set the Cutoff Voltage Conservatively

The cutoff is the battery level at which the kit shuts the camera down. In mild weather, a standard setting is usually fine. In freezing weather, or with an older battery, choose a higher cutoff so the camera stops sooner and leaves more power for starting. Avoid the lowest setting available, and follow your camera and vehicle manufacturer’s guidance for your battery type.

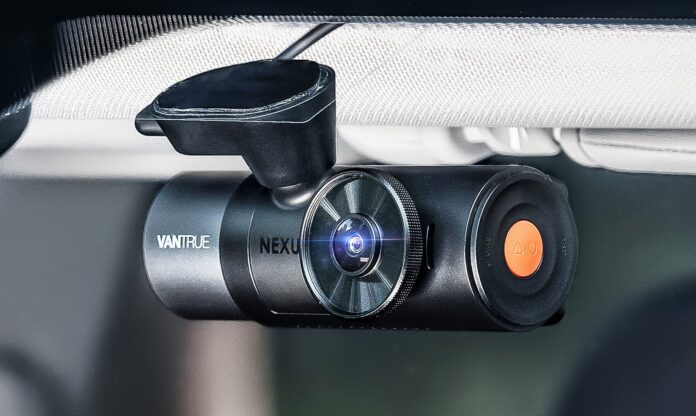
Your parking mode type matters too. Modes that record continuously generally use more power than modes that wake only on impact or motion, so a collision-triggered or low-bitrate mode is often the better choice for long stays in the cold. Many cameras let you switch between these. The Nexus 4S and Nexus 5S, for example, offer buffered motion detection, collision detection, low-bitrate, and low-framerate options, so you can choose a lighter mode when the car will sit for days.

5. Check Your Dash Cam’s Cold-Weather Specs

Cold affects the camera itself, not just the car. Before winter, check its rated operating temperature range in the manual. Some models use a supercapacitor instead of a lithium battery, which is generally better suited to temperature extremes. The Nexus 4S, Nexus 4 Pro S, and Nexus 5S are examples, and the N4 Pro S and N5S list an operating range down to -20°C (-4°F). Whatever model you own, confirm the specs for your exact camera rather than assuming

6. Prepare the Battery and the Dash Cam Before the First Freeze

Test the battery. Have the battery and charging system checked, especially if it is several years old.

Check the memory card. Learn how to format the SD card for your dash cam as the manufacturer recommends, and confirm that videos save correctly.

Clean the lens and make sure recordings are clear, including at night.

Set up remote access. A wifi dash cam lets you review clips on your phone without standing out in the cold, and some models with dash cam LTE support can send an alert when something happens.

Review parking mode settings after any firmware update.

Get help with wiring if you are unsure about fuse boxes. A professional install is safer than guessing.

Winter car park tip: If your car will sit untouched for several days in freezing weather, consider turning parking mode off, using a dedicated dash cam battery pack, or choosing a battery powered dash cam that doesn’t draw from the car at all. Check its cold-weather operating range first.

Winter Parking Mode Checklist

  • Battery and charging system tested.
  • Camera powered by a hardwire kit with low-voltage protection.
  • Cutoff voltage set conservatively.
  • Parking mode type matched to how long the car sits.
  • Operating temperature range confirmed.
  • Memory card and lens checked.   

Conclusion

Winter does not have to mean choosing between a recording dash cam and a car that starts. With a hardwire kit and low-voltage protection, parking mode stops drawing power before the battery gets too low. With a car dash camera rated for low temperatures, it keeps watching through snow, ice, and freezing nights, and records the bump or hit-and-run you would otherwise never see.

Ready for winter? Shop hardwire kits for your dash cam and set up parking mode before the first hard freeze.

Role of Full-Body Protective Gear in Reducing Motorcycle Crash Injuries

Full-body protective gear can help reduce injuries when a motorcycle crash happens. A good helmet, sturdy jacket, gloves, protective trousers, and boots give riders a layer of protection between their bodies and the road.

Even a quick trip can go wrong. lose gravel, a sudden stop, or a driver who fails to check their blind spot can send a rider tumbling onto the pavement. Following simple safety tips, like wearing the right gear before setting off, may help prevent a bad crash from becoming even worse.

In this article, we will explore the role of full-body protective gear in reducing injuries in motorcycle accidents.

How Does Full-Body Protective Gear Reduce Motorcycle Injuries?

Unlike car drivers, motorcyclists have little between them and the road when a crash happens. They can be thrown onto the pavement or dragged across it, sometimes before they have time to react. The right gear won’t stop every injury, but it can protect the skin and cushion blows to vulnerable parts of the body.

The danger is reflected in the numbers. The National Highway Traffic Safety Administration (NHTSA) reported 6,228 motorcyclist deaths in the United States in 2024, accounting for 16% of all traffic fatalities. NHTSA research also shows that helmets reduce the risk of death by 22% to 42% and the risk of brain injury by 41% to 69%.

The rest of the body needs protection, too. A tough jacket can help prevent painful road rash, while knee armor can cushion some impacts. Gloves are just as useful. When a rider falls, reaching out to catch themselves is often an instinctive reaction, and bare hands can take the worst of it.

Is Full-Body Protective Gear Required by Motorcycle Law?

Motorcycle laws vary by state. Some U.S. states require all riders to wear helmets, while others only require certain riders to wear them. Protective jackets, trousers, and boots generally aren’t legally required.

Federal regulation 49 CFR § 571.218 sets safety standards for motorcycle helmets sold in the U.S., while state laws determine who must wear one.

The difference is clear in helmet use. NHTSA reported that in 2021, 86.1% of riders observed in states with universal helmet laws wore compliant helmets, compared with 53.4% in states without them. Even when full-body gear isn’t required, wearing it can help protect you when a ride goes wrong.

Full-Body Protective Gear Includes

Each item protects a different area of the body:

  • Helmet: Helps protect the head and brain. Choose one that meets recognized safety standards and fits securely.
  • Armored jacket: Protects the upper body from road friction and helps absorb impacts to the shoulders and elbows.
  • Protective trousers: Shield the hips, thighs, and knees from scrapes and some impact injuries.
  • Gloves: Protect the hands and improve grip on the handlebars.
  • Motorcycle boots: Cover the feet and ankles, helping protect them from twisting, crushing, and abrasions.
  • Reflective clothing: Makes riders easier to see in traffic, particularly at night.

How Can Riders Choose Effective Protective Gear?

Expensive gear isn’t always the best fit, and cheap gear isn’t always a bargain. Look for sturdy materials, reliable fasteners, and armor that stays in place when you move. Your gear should feel comfortable, too, because protection only helps if you actually wear it.

A few safety tips can help you choose wisely:

  • Choose a certified helmet that fits snugly, and fasten the chin strap.
  • Look for tough jackets and trousers with built-in armor.
  • Wear gloves that protect your hands without making it hard to grip the handlebars.
  • Choose boots that cover your ankles.
  • Wear bright or reflective details so drivers can spot you more easily.
  • Check your gear for tears or damage and replace worn-out items.​

Points to Remember

  • Full-body gear helps reduce the severity of motorcycle injuries.
  • Helmets lower the risk of death and brain injury.
  • Armored clothing, gloves, and boots protect other vulnerable areas.
  • Helmet laws vary by state, but protective gear is worthwhile regardless.
  • Proper fit, good materials, and regular inspections matter.
  • Reflective clothing helps other drivers see riders.
  • Safe riding and protective gear work best together.

Thinking About a Fall Hair Change? Start Here

Photo by depositphotos at https://depositphotos.com/

There’s something about fall that makes people want a new look. Maybe it’s the cooler weather, the new wardrobe or just the feeling of a fresh start. Whatever the reason, hair salons get busy this time of year.

If you’ve been thinking about a change but don’t know where to start, two of the most popular fall updates are a new cut and a new color. And two options keep coming up again and again: the layered bob and dark auburn hair.

Why a New Cut Is the Easiest Refresh

A haircut is one of the quickest ways to change your whole look. You don’t have to commit to a big color process, and a good cut can make your hair look thicker, healthier and more styled with less effort.

The bob has been one of the most-requested cuts for years, and it’s easy to see why. It works on most hair types and face shapes, and it’s easy to grow out if you change your mind.

Why the Layered Bob Works for So Many People

A classic blunt bob can look sharp, but it can also feel a bit heavy, especially if you have thick hair. That’s where layers come in.

Adding layers to a bob takes out bulk, adds movement and creates shape. If your hair is fine, layers can make it look fuller. If it’s thick, they make it lighter and easier to style. And if you have waves or curls, layers help your natural texture show off instead of falling flat.

There are lots of ways to wear it, too. A shaggy layered bob feels relaxed and a little ’70s. A sleek, softly layered bob looks polished and grown-up. A bob with curtain bangs adds a romantic, face-framing touch.

For photos, celebrity inspiration and tips on what to ask your stylist, this guide to the layered bob is a great place to start.

Why Fall Is the Season for Warm Color

If you’d rather keep your length, a color change might be the way to go.

Fall is all about warm, rich shades, and auburn is right at the top of the list. It sits somewhere between red and brown, with deep copper and mahogany tones that look amazing against fall colors like camel, burgundy and forest green.

Dark auburn in particular is a great choice if you’re nervous about going full red. It’s subtle in low light, glows in the sun and works on a wide range of skin tones. Brunettes can usually get there with a gloss or a demi-permanent color, without heavy bleaching.

Stars like Jessica Chastain, Emma Stone and Sophie Turner have all worn versions of the shade over the years, which shows just how flattering it can be.

If you want to see the different shades and celebrity examples side by side, check out this guide to dark auburn hair before you book your appointment.

Should You Do Both?

Honestly, a layered bob in dark auburn is one of the best fall combos out there. The layers catch the light and show off all the different tones in the color, and the warm shade gives the cut extra depth.

If you want a big change, doing both at once is a fun way to completely refresh your look. If you’d rather take it slow, start with the cut and add color a few weeks later.

Tips Before You Go to the Salon

Bring photos. Words like “short” and “auburn” mean different things to different people. Pictures help your stylist see exactly what you want.

Be honest about your routine. If you don’t blow-dry your hair every day, tell your stylist so they can cut layers that work with your natural texture.

Think about upkeep. Auburn and red shades fade faster than other colors, so a color-safe shampoo and a gloss every few weeks will keep it looking rich.

Ask about your skin tone. A good colorist can tweak the shade to be warmer or cooler so it suits you best.

Plan your styling. A layered bob looks best with a little texture, so a light sea salt spray or a round brush can help the layers show up.

The Bottom Line

You don’t need a dramatic transformation to feel like a new person this fall. A layered bob, a shade of dark auburn or both can make a big difference with very little stress.

Should Sixteen-Year-Olds Really Be Trusted With Two Tons of Moving Steel?

Photo by depositphotos at https://depositphotos.com/

Few moments feel bigger to a teenager than getting a driver’s license. That small plastic card means freedom. No more begging for rides, no more waiting in the school pickup line. For parents, it can mean relief and a whole new level of worry.

Handing a sixteen-year-old the keys to a two-ton vehicle is a serious responsibility. Teen drivers face real risks while they’re still learning, and every crash involving a young driver reignites the debate about whether the system starts them too early.

Proposals for raising the driving age to 18 pop up regularly, and they spark strong reactions on both sides. Supporters point to safety. Critics point to practical realities. The truth sits somewhere in a complicated middle that deserves a closer look.

Why Teen Drivers Face Unique Challenges Behind the Wheel

Experience can’t be rushed. New drivers simply haven’t seen enough situations to recognize hazards quickly. A ball rolling into the street, a car drifting toward the lane line, or brake lights several cars ahead may not register as danger right away. Spotting trouble takes practice.

Judgment is still developing too. The parts of the brain involved in impulse control and risk assessment continue maturing into the mid-twenties. That doesn’t make teens reckless by default, but it can make split-second decisions harder under pressure. The science backs that up.

Peer influence and distraction pile on. A car full of friends, a buzzing phone, or loud music can pull attention away from the road. Research on young drivers consistently highlights passengers and phones as major sources of distraction. Those risks add up quickly.

The Argument for Making Teenagers Wait Longer

Supporters of a higher driving age focus on crash risk. Young drivers, especially in their first months of independent driving, have historically shown higher crash rates than more experienced adults. Delaying full privileges, they argue, could prevent tragedies. Fewer crashes means fewer funerals.

Maturity is another big part of the argument. An eighteen-year-old may handle pressure, peer influence, and risky situations differently than a sixteen-year-old. A couple of extra years could mean better judgment by the time someone drives without supervision. Time does some of the teaching.

More supervised practice is also possible with a later start. Teens could spend additional time learning with experienced drivers before going solo. That longer runway might help them build skills gradually, rather than jumping into full independence the moment they turn sixteen. Patience can pay off.

Why Raising the Driving Age Could Create New Problems

Families depend on teen drivers in very practical ways. Working parents may rely on older kids to drive themselves to school or pick up siblings. Taking away that option could create real scheduling and financial strain for many households. Logistics matter more than lawmakers sometimes admit.

School and work access matter too. Many teens hold jobs that help their families or save for college. Without a license, getting to work, sports practice, or community college classes could become difficult, especially where public transportation is limited or nonexistent.

Rural mobility is a major concern. In small towns and farm communities, driving may be the only practical way to get anywhere. Critics also argue that age alone doesn’t make someone a safe driver, since an inexperienced eighteen-year-old is still inexperienced. Skill comes from practice.

Could Better Training Be More Effective Than a Higher Age Limit?

Graduated driver licensing programs offer a middle path. Instead of handing over full privileges at once, these systems phase them in. New drivers start with a learner’s permit, move to a restricted license, and earn full privileges over time. Every state uses some version.

Supervised practice requirements help build real experience. Many programs require a certain number of hours behind the wheel with a licensed adult, including some nighttime driving. That practice helps new drivers handle situations before they’re on their own. Reps build reflexes.

Passenger restrictions and nighttime limits target specific risks. Limiting how many young passengers a new driver can carry reduces distraction, while curfews reduce exposure during riskier late-night hours. Evidence-based approaches like these aim to manage danger without simply waiting for a birthday. Readiness matters more than the calendar.

Conclusion

The debate over teen driving touches safety, independence, and family logistics all at once. Raising the driving age to 18 has passionate supporters and equally passionate critics, and both sides raise points worth considering. Easy answers are hard to find.

Teen drivers do face real challenges, from limited experience to distraction. But age is only one factor. Graduated licensing, supervised practice, and smart restrictions may address many of the same risks while preserving practical mobility. Training and age can work together.

The real question is when drivers are ready, not just how old they are. Balancing public safety with practical transportation needs, and leaning on proven driver education strategies, can help teens build the skills that keep everyone safer.

What Happens When a Robot Driver Meets an Unpredictable Human World?

Photo by depositphotos at https://depositphotos.com/

Picture a four-way stop on a busy afternoon. A driver waves another through. A cyclist rolls slowly, deciding whether to go. A kid on a scooter hovers at the curb. Humans read this chaos with glances and nods. Machines have to figure it out from data.

Teaching a car to drive itself sounds simple until you realize how much of driving is unwritten. Eye contact, hand signals, hesitation, and gut instinct fill gaps the rulebook never covers. Programming all of that into software is an enormous challenge.

That’s why the dangers of self-driving cars deserve a clear-eyed look. The question isn’t whether the technology is impressive. It clearly is. The question is how it handles the messy, unpredictable situations real roads throw at every driver, human or not.

Why Driving Is Harder Than Following Traffic Rules

If driving were just following rules, computers would ace it. Stop at red lights, stay in your lane, obey the speed limit. But real roads demand constant prediction. Will that car merge? Is that pedestrian about to step out? Guessing right is the whole game.

Ambiguous situations are everywhere. A police officer directing traffic might override a green light. A delivery truck double-parked might require crossing a center line. Human drivers improvise in these moments, often bending rules slightly to keep everyone safe and moving.

Unexpected conditions add another layer. A mattress in the road, a flooded underpass, or a fallen tree branch demands quick judgment. Humans can draw on years of experience and common sense. Automated systems have to recognize the situation and respond correctly, every single time.

The Situations That Can Confuse Automated Driving Systems

Construction zones are notorious trouble spots. Lane lines shift, cones appear in odd places, and workers wave vehicles through unconventional paths. Systems trained on normal road layouts may struggle when the road suddenly looks nothing like the map they expected.

Weather and visibility cause problems too. Heavy rain, snow, fog, and blinding glare can interfere with cameras and other sensors. Dirt or ice on a sensor can limit what the system sees. When the inputs get fuzzy, the decisions can get shaky.

Emergency vehicles and unpredictable people round out the list. A fire truck approaching from behind requires a quick, correct response. Jaywalkers, erratic drivers, and cyclists weaving through traffic can behave in ways that are difficult to predict, even for very sophisticated software.

Why Not All Self-Driving Technology Is the Same

The term self-driving gets tossed around loosely. Plenty of vehicles marketed with fancy names actually offer driver-assistance features, like adaptive cruise control or lane-centering. These systems help, but they still require a human to watch the road and stay ready.

Engineers often describe automation in levels, ranging from no automation to full automation. Lower levels support a human driver, who remains responsible for monitoring the road. Higher levels can handle driving tasks within specific conditions, sometimes without a human taking over.

Confusing those categories can be dangerous. A driver who treats an assistance system like a fully autonomous chauffeur might stop paying attention at exactly the wrong moment. Knowing what a vehicle can actually do, and what it can’t, matters enormously. Marketing isn’t a manual.

Who May Be Responsible When Automated Technology Contributes to a Crash?

Human drivers often remain part of the equation. If a vehicle requires supervision and the driver was distracted or ignored warnings, that driver may bear responsibility. Using an assistance system doesn’t automatically erase the duty to drive carefully. The driver’s seat still comes with obligations.

Manufacturers and software developers may also face scrutiny. If a defect in design, sensors, or programming contributed to a crash, product liability claims might come into play. Marketing that overstates what a system can do could also become part of the analysis.

Other parties can be involved too, like fleet operators, maintenance providers, or companies running robotaxi services. There’s no single universal rule. Responsibility depends on the technology involved, the facts of the crash, and the laws that apply where it happened.

Conclusion

Automated driving technology is impressive and evolving fast. Still, the road is full of human unpredictability, and machines have to handle all of it safely. That challenge sits at the heart of every conversation about automated vehicles. Progress and caution can coexist.

Safety depends on what each system can actually do, how well it’s been tested, and whether humans supervise it properly when required. Treating driver assistance like full autonomy creates real risk. Clear expectations matter as much as clever engineering.

The future of driving still has plenty of human questions. Anyone involved in a crash where automated technology may have played a role can talk with a qualified attorney about how responsibility might be evaluated. Answers usually start with the evidence.

How Can Defective Seat Belts Make Car Accident Injuries Worse?

Defective seat belts can make car accident injuries worse by failing to hold occupants securely, releasing during impact, or placing excessive force on vulnerable body parts. Even when a collision is unavoidable, a properly functioning restraint can reduce the risk of serious injury by limiting movement and spreading crash forces across stronger areas of the body.

Chicago, Illinois, has busy expressways, crowded intersections, and heavy commuter traffic, creating many situations where sudden braking or collisions can occur. The city’s Kennedy and Dan Ryan Expressways experience frequent stop-and-go traffic, increasing the likelihood of sudden stops and rear-end collisions. 

Illinois law generally requires drivers and passengers covered by the state’s seat belt law to wear properly fastened restraints. When a defective belt contributes to injuries, a motor vehicle accident attorney serving Chicago may assess the relevant evidence and applicable legal responsibilities.

Retractor Problems Increase Impact Injuries

The retractor should allow normal belt movement but lock during sudden deceleration. If its locking mechanism fails, the occupant may travel farther forward before hitting the steering wheel, dashboard, or another surface. This extra movement increases the risk of chest injuries, facial fractures, and brain trauma.

False Latching Creates Hidden Danger

A buckle may appear connected without securely engaging its locking mechanism. Occupants might believe they are protected, even though the belt can actually separate under pressure. Manufacturing defects, worn components, or damaged buckles may cause this problem, making proper inspection important after unusual belt behavior.

Damaged Webbing Can Break Under Pressure

Seat belt webbing may withstand substantial forces during a crash. Fraying, cuts, chemical damage, prior crash-induced stress, or manufacturing flaws can weaken its fibers and compromise its restraint. If the material tears, the occupant may suffer injuries that a properly functioning belt could have helped prevent.

Incorrect Belt Position Can Damage Internal Organs

While the shoulder belt should cover the chest, the lap belt should lie low across the hips. If defective components allow the belt to ride over the abdomen or fit improperly, crash forces can damage abdominal organs, ribs, and the spine. Severe cases may involve internal bleeding.

Faulty Pretensioners Can Reduce Protection

Pretensioners tighten seat belts rapidly during certain crashes, helping restrain occupants before they move too far forward. A defective pretensioner may fail to activate, leaving excess slack during impact. Faults in restraint systems can also affect how forces are managed, potentially increasing the risk of chest and shoulder injuries.

Failed Restraints Can Injure Other Passengers

An occupant whose belt fails may collide with nearby passengers or strike the driver as they move through the cabin. Unrestrained rear-seat occupants can also injure people sitting in front. Therefore, a defective restraint can increase injury risks beyond the person wearing the faulty belt.

Liability may involve a vehicle or seat belt manufacturer, a parts supplier, or another responsible party, depending on the defect and circumstances. Product liability claims generally require evidence connecting a defect to the injury. Maintenance history, crash data, photographs, medical records, and professional inspections can help establish what happened.

Preserve Evidence After a Collision

Keep the damaged belt and buckle intact when possible, and avoid repairs until an appropriate inspection is completed. Photograph visible damage, retain repair and purchase records, and seek medical assessment for injuries. In Illinois, deadlines and legal requirements can affect claims, so documenting the defect and its connection to the crash is important.

Wrapping Up

  • Buckle failures can leave occupants unrestrained during impact.
  • Retractor and pretensioner defects may increase forward movement.
  • Damaged webbing can tear under crash forces.
  • Poor belt positioning can injure the abdomen and spine.
  • Failed restraints may expose other passengers to additional harm.
  • Product liability depends on evidence, causation, and applicable law.

Beyond Parking: Lighting, Airflow, and Workspace Comfort for Car Enthusiasts

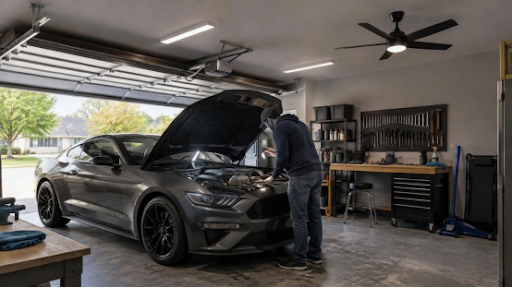
It’s amazing how quickly an ordinary garage can become a frustrating place to work. You’re halfway through a simple job, the hood is up, and the ceiling light is shining on everything except the part you need to see. Then you look up and realize the garage door tracks take up half the space where you might put better lighting or a fan.

The fix isn’t necessarily a bigger toolbox or a complete remodel. A more useful place to start is the environment itself: where the light falls, how air moves, how much room you have to work, and whether the setup is safe for the jobs you actually do.

Map the Garage Around the Work You Actually Do

First, forget the picture-perfect garage for a minute. Think about an ordinary Saturday. Are you washing the car, checking fluids, changing wheels, sorting parts on a bench, or working through a restoration project that takes up the whole weekend? Those jobs use the same floor, but they don’t need the same lighting or the same amount of space.

Detailing is a good example. You might need light from the side to pick up fine marks in the paint, then a different portable light to check the wheel wells. Mechanical work brings its own problems: an open hood creates deep shadows, and a floor jack or creeper needs a clear path beside the car. If you mainly park and store gear, simpler lighting and clear walkways may be all you need.

Before buying anything, park the vehicle where it normally sits. Open the doors and hood. Raise the garage door. Stand at the workbench. It’s a better test than an empty-room measurement.

Layer Lighting for Parking, Detailing, and Repairs

One bright fixture in the middle of the ceiling can make a garage look well lit until you start doing real work. Your body blocks the beam, the hood throws a shadow, and suddenly the bolt you need hides in the dark. That’s why it helps to think in layers instead of looking for one light that does everything.

Start with general lighting so you can walk around the car, find equipment, and spot anything on the floor. Then add task lighting where you actually work. A movable inspection light is handy under the hood or beneath a dashboard. For paint correction or detailing, focus on the direction and quality of the light, not just the claimed brightness on the box.

In a garage that doubles as a hobby room or general-purpose hangout, some people consider ceiling fans with lights to combine circulation and overhead illumination. That can be a sensible use of a ceiling position if the particular fixture is rated for the environment and fits the space. Just don’t expect a fan-mounted light to replace a proper inspection light when you’re checking a paint finish or hunting for an oil leak.

Balancing overhead illumination with dedicated work lights makes any repair job significantly smoother. Upgrading your primary setup with a high-quality ceiling light fixture ensures you have consistent, bright ambient coverage across the entire garage.

Air

Neutral or daylight-looking light can help with detailed tasks, but glare, shadows, and fixture quality matter just as much. Test the light where your eyes and hands will actually be.

Separate Air Movement From Hazardous-Air Ventilation

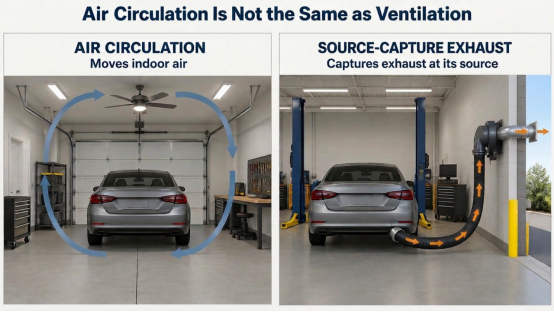
A stuffy garage makes even a short job feel longer. It’s tempting to point a big fan at the workbench and call the problem solved. For comfort, that may help. Moving air across your skin can make a hot afternoon feel more bearable. But here’s the distinction worth remembering: moving air around the room isn’t the same as getting contaminated air out of it.

A ceiling fan, floor fan, or wall fan mainly circulates air. Exhaust ventilation is designed to remove air, and some automotive jobs call for much more specific controls. Running engines, spraying coatings, welding, and using certain solvents can introduce hazards a normal circulation fan can’t address. Poor placement can spread dust or vapors.

The carbon-monoxide warning is especially important. The CDC advises against running a vehicle inside an attached garage even with the garage door open. If a repair task requires an engine to run, don’t treat an open door and a household fan as an exhaust system. Professional shops use appropriate procedures and, where needed, dedicated exhaust capture and ventilation designed for the activity. Painting and other hazardous operations may require purpose-built equipment and controls.

For routine comfort, choose where you want airflow and check that it doesn’t scatter lightweight parts, dust, or paperwork. For fumes and combustion gases, address the source and ventilation first. They’re two different jobs, and it’s safer to keep them that way.

Check Ceiling Clearance Before Adding Overhead Equipment

Garage ceilings are busier than they look. Even a fairly empty two-car garage may have a door opener, tracks, storage racks, lights and electrical runs competing for the same overhead space. The real test isn’t whether a fan fits while the door is closed. It’s whether the entire installation works through the door’s full range of motion and around everything else that moves or projects into the space.

If you’re considering garage ceiling fans with lights, measure the complete installed height and the lowest part of the fixture, not just its blade diameter. Check the manufacturer’s required clearances and location rating. A ceiling that looks high enough from the floor may leave surprisingly little space once a vehicle roof rack, open hatch, storage platform, or raised garage door comes into play.

A workbench under a fan isn’t automatically a problem, but a lift, ladder, or tall piece of equipment can change the clearance calculation. Use the exact model’s instructions and, where appropriate, a qualified installer. There’s no benefit in gaining a little airflow at the cost of an awkward or unsafe overhead layout.

Match Fan Type to Garage Size and Work Zones

Not every garage needs something hanging from the ceiling. A small space where you work in one corner may be better served by a directional fan you can move as the job changes. A wall-mounted unit might keep the floor clear, as long as there’s a suitable mounting spot. A ceiling fan can make sense when the room has enough unobstructed overhead space, and you want more general circulation while you’re in the garage.

A bigger hobby workshop is a different story. One giant fan won’t necessarily serve all three areas, particularly if walls, cabinets or equipment interrupt the airflow. Separate work zones may make more sense.

For those larger layouts, large shop ceiling fans are one category worth evaluating alongside smaller directional equipment. Look beyond blade span: the documented airflow, mounting height, controls, environmental rating, and nearby obstructions all matter. Also think about what happens when you open a roll-up door or move a lift. The best position on an empty floor plan may be the worst during a normal workday.

And keep the terminology straight. A comfort fan isn’t an exhaust fan, and industrial styling doesn’t prove a fan is rated for harsh conditions. Check the actual product documentation rather than buying by the name or appearance alone.

Make Long Garage Sessions Easier on the Body

Comfort isn’t only about temperature. Anyone who’s spent a long afternoon working beside a car knows how often you end up kneeling, reaching sideways, or twisting around something that seemed easy to access ten minutes earlier. A few small changes can make the space less awkward without turning it into a professional race shop.

Put frequently used tools where you can reach them from your usual working position. If you spend time at a bench, get the height right for the tasks you do there, and leave enough light to see small fasteners clearly. A stable mechanic’s stool may help for wheel-level jobs; a suitable creeper can help with under-car access when the vehicle is properly secured. Anti-fatigue mats can help at standing stations, but keep them out of paths where wheeled equipment needs to move.

garage

Don’t overlook the simple things: a dry floor, a place for a portable light, room to set down a removed part, and somewhere to step back from the vehicle. It’s not glamorous, but it helps.

When a Garage Becomes a Professional Auto Shop

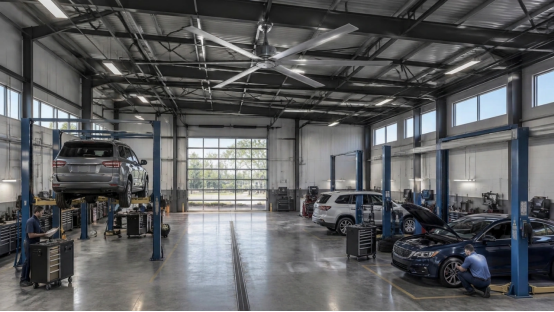
Scale changes the conversation. In a home garage, the question might be where to put one workbench and whether a fan clears the door tracks. In a professional shop with multiple service bays, you’re dealing with vehicle lifts, taller equipment, shared work areas, overhead lighting, building systems, and workers who aren’t all doing the same task at the same time.

Some high-ceiling facilities may evaluate commercial HVLS fans for broad, low-speed air circulation across open areas. They are not simply oversized household fans, and they’re not right for every repair building. Structural support, installed height, sprinkler and other overhead systems, electrical compatibility, control zones and interaction with existing ventilation all have to be reviewed for the actual site.

The ventilation point still stands. A large circulation fan does not take the place of vehicle-exhaust capture, spray-booth ventilation, or other controls required by hazardous work. In fact, airflow equipment should be planned so it doesn’t undermine those systems. If you’re fitting out a real service facility, involve the people responsible for building safety, mechanical systems, and installation before picking equipment from a product page.

The goal is better comfort without disrupting the systems that keep the shop safe.

Build a Practical Garage Improvement Plan

It’s easy to turn a garage upgrade into a shopping list. A better approach is to change one problem at a time and see whether the fix actually works. Start by watching where you stand and what you struggle to see during your next job. If the bench is dark, deal with the bench light. If an open hood blocks the overhead fixture, try a movable task light before rewiring the whole garage.

Next, check the serious stuff: any exhaust or chemical exposure concerns, the clear travel of the garage door, and the position of ladders, lifts or tall gear. Those aren’t details to figure out after you’ve mounted a new ceiling fixture. Once the space is properly planned, you can decide whether a floor, wall or ceiling fan would add useful comfort.

Finally, use the garage for a while before adding more gear. You may discover that better light and a clearer work area solve most of the annoyance. The best garage upgrade isn’t always the biggest one. It’s the one you notice because the next job goes more smoothly.

A good garage doesn’t have to look like a TV workshop. It just has to work for your car and the jobs you enjoy doing. Light the places where you need to see, move air where it helps with comfort, handle fumes with the proper controls, and keep the overhead space clear. Get those basics right and the garage starts feeling less like a storage room you happen to work in, and more like a place built for the job.

Same Number Plate, Different Car: Inside Britain’s Growing Plate Cloning Problem

Photo by depositphotos at https://depositphotos.com/

Number plate cloning, the British version of someone copying your license plate, is climbing fast. The UK’s Driver and Vehicle Licensing Agency (DVLA) logged 11,394 reports of cloned plates in 2025. That’s up 9% on the year before and 54% higher than in 2020. In London alone, penalty notices canceled because of cloning rose from 22,450 in 2021 to 36,794 in 2023, according to a BBC investigation.

A camera that only checks one thing

Britain leans heavily on Automatic Number Plate Recognition (ANPR) cameras. More than 18,000 of them make around 90 million plate reads a day, and every one of those reads assumes the plate is genuine. They enforce speed limits, bus lanes, low-emission zones and London’s congestion charge, and every fine is mailed automatically to the registered keeper of the plate the camera reads.

That’s where cloning comes in. A criminal finds a car that matches theirs in make, model and color, often from an online sales listing. They have a set of plates made up with that car’s registration and bolt them on. From then on, every camera that spots them bills the real owner.

Jon Kirkbright, Sales Director at RegHunters, one of the UK’s largest DVLA-recognized plate suppliers, says the system is working exactly as designed, and that’s the problem.

“Every one of those cameras is doing its job perfectly. It reads the plate, matches it to a name and sends the bill. The trouble is, the plate is the only thing it checks, and anyone can get one made.”

Why the plates are so easy to get

Around 34,000 businesses are registered to sell number plates in Britain, and getting registered costs a one-off £40, roughly $50. The plates themselves carry no holograms, chips or watermarks. The British Number Plate Manufacturers Association has told lawmakers that the UK and Ireland are the only countries in Europe without security features in their plates.

How victims find out

There’s no alert and no database to check. Most people discover the problem when a parking ticket arrives from a town they’ve never visited, or a speeding notice is timed while their car sat in the driveway. Others hear from debt collectors over unpaid fuel, or from police asking where they were on a particular day.

“We’re taking two or three calls a day from people in this position,” says Jon. “Some of them are dealing with half a dozen different councils at once, each with its own appeals process.”

The strongest evidence is usually the camera image itself. Cloners copy the basics, but wheels, roof racks, trim and dents rarely match. Owners who keep dated photos of their own car from every angle have a much easier time proving the difference.

Getting back on track

The advice from police and the trade is consistent. First, report the cloning to the police and get a crime reference number, because every appeal depends on it. Next, notify the DVLA and tell your insurer. Then answer every penalty notice in writing before its deadline, even the ones that look ridiculous. In the UK, ignoring a speeding notice can lead to prosecution for failing to name the driver.

“Speed matters,” Jon says. “The sooner you get a crime reference number and start answering notices, the less of a mess you’re left to untangle.”

The final step is the one many victims overlook: moving the car onto a new registration. The cloned plate stays out there, but it no longer leads back to the owner.

“A fresh registration is the closest thing to a clean slate,” says Jon. “The old number is still on someone else’s car, but it stops pointing at you.”

The checkered flag

Until British plates get the kind of security that protects a credit card, cloning looks set to keep rising. For now, the best defenses are simple: blur your plate in any photo you post online, fit tamper-resistant screws, open every letter promptly and act the moment something doesn’t add up.

For a deeper look at cloned, ghost and stealth plates, RegHunters has published a full guide to number plate cloning.

How Broken Headlight Pieces Can Help Identify a Vehicle After a Hit-and-Run

Broken headlight pieces can provide valuable clues when investigators are trying to identify a vehicle involved in a hit-and-run. The fragments may reveal the type of headlight, the vehicle’s make or model, and sometimes its approximate year of manufacture. When combined with surveillance footage, witness statements, paint transfer, and other physical evidence, these small pieces can help investigators narrow their search and connect a particular vehicle to a collision.

When the responsible party leaves the scene of a crash, it can be difficult for injured victims to identify the driver or obtain compensation. However, after a hit and run accident, even seemingly insignificant debris may become important evidence. A headlight fragment left on the road can help investigators reconstruct the collision, determine which vehicle was involved, and develop leads that might otherwise be missed.

What Headlight Fragments Can Reveal

Modern vehicle headlights are made from several components, including plastic lenses, housings, reflectors, and mounting brackets. When a vehicle strikes another car, a pedestrian, or a fixed object, some of these parts may break off and remain at the scene.

Investigators can examine the fragments for identifying marks, manufacturer logos, part numbers, and molded symbols. These details may help match the debris to a particular headlight assembly or a group of compatible vehicles.

The shape and construction of the fragments can also provide clues. Different manufacturers use distinct headlight designs, and components may change between model years. Although a fragment may not identify one specific vehicle by itself, it can help eliminate unlikely possibilities and guide further investigation.

How Investigators Connect Debris to a Vehicle

Identifying a vehicle usually requires comparing physical evidence with other information gathered during the investigation. Investigators may document the location of the debris, photograph the fragments, and compare their features with replacement parts or manufacturer records.

Several forms of evidence can strengthen the process:

  • Part numbers and manufacturer markings: These may help narrow down compatible vehicle makes, models, and production years.
  • Paint transfer: Paint found on the debris or another damaged surface may provide clues about the vehicles involved.
  • Vehicle damage: A suspected vehicle with a missing headlight or matching damage may warrant closer examination.
  • Surveillance footage: Security cameras, traffic cameras, or nearby business recordings may capture the vehicle before or after the collision.
  • Witness descriptions: Information about the vehicle’s color, size, direction of travel, or visible damage can help investigators evaluate potential matches.

Investigators must consider whether the evidence genuinely connects the vehicle to the crash. A matching headlight part may narrow the search, but it does not automatically prove that a particular driver caused the collision.

Why Preserving the Scene Matters

Physical evidence can disappear quickly after a crash. Passing vehicles may scatter debris, rain can wash away traces, and road maintenance crews may remove fragments. Promptly documenting the scene can therefore make a difference.

Anyone involved in a collision should prioritize safety and seek medical assistance when necessary. Witnesses should contact law enforcement and provide factual information about what they observed. People should not enter traffic or approach a dangerous location to collect debris themselves.

Photographs taken from a safe location may help document the scene, vehicle damage, road conditions, and the position of visible fragments. Investigators can then collect and examine relevant evidence using appropriate procedures.

Maintaining records of where evidence was found can also help establish its relevance. If the debris is moved or handled without documentation, questions may arise about whether it came from the collision under investigation.

How Physical Evidence Can Support a Compensation Claim

When a hit-and-run driver is identified, physical evidence may help establish the connection between the vehicle and the crash. This can support an investigation into liability and assist an injured person pursuing an insurance claim or personal injury lawsuit.

Victims should preserve medical records, repair estimates, photographs, police report information, and communications with insurance companies. If the driver cannot be identified, uninsured motorist coverage may provide benefits in some circumstances, depending on the policy and applicable law.

Legal deadlines and insurance reporting requirements can affect available options. Seeking guidance early may help victims understand which evidence to preserve and what steps to take next.

Important Points to Remember

  • Broken headlight fragments may contain markings that help identify a vehicle’s make, model, or headlight assembly.
  • Investigators compare debris with vehicle damage, paint transfer, surveillance footage, and witness accounts.
  • Physical evidence should be documented and collected appropriately to preserve its reliability.
  • Headlight fragments can provide investigative leads but do not independently prove who was driving.
  • Prompt reporting and careful documentation can help protect an injured person’s legal and insurance options.